 |
|
EyeLink is a partner supported communication method that allows an individual to communicate just through eye gaze. EyeLink is a simple and effective method of eye gaze communication which requires just an acetate or acrylic/Perspex sheet which is printed or engraved. EyeLink can be used with letters or symbols for communication.
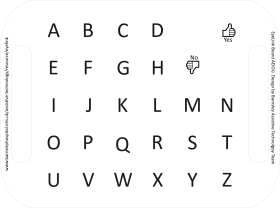
An EyeLink consists of a transparent frame with letters or symbols on, positioned between the person with communication difficulties and their conversation partner. Messages are generated by eye pointing to the relevant location on the frame and are recorded by the conversation partner.
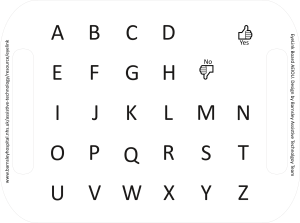
The layout of an EyeLink Communication Board (AEIOU)
EyeLink is one method of using eye gaze, and there are other methods such as E-Tran and technology based eyegaze systems. In many cases we find EyeLink can provide a good additional method to using a technology based eyegaze system, but for some is also a preferable method of communication. We first came across EyeLink after reviewing work by Amy Roman, Wendy Quach et al on a comparison of the different methods, and the subsequent PhD by Sarah Marie Swift – and so acknowledgement and thanks to them
This resource explains how to use EyeLink (you can also download the brief user guide as a PDF). There are also instructions on different ways of making EyeLink boards – the designs to make these boards are freely available.
How to Use EyeLink
An agreed method for the individual to indicate they are ready, finished and to indicate ‘yes’ and ‘no’ is recommended before introducing this method. The principle of EyeLink is simple;
- The communication partner holds the board up in front of the client (normally with the letters in ABC order for the individual communicating).
- The individual focuses their eyes on the target letter or symbol.
- The communication partner moves the board until their eyes meet the eyes of the client and both people are looking at the same item.
- The communication partner confirms with the client that they have correctly understood which item has been selected.
- This letter or symbol is recorded, often by writing down.
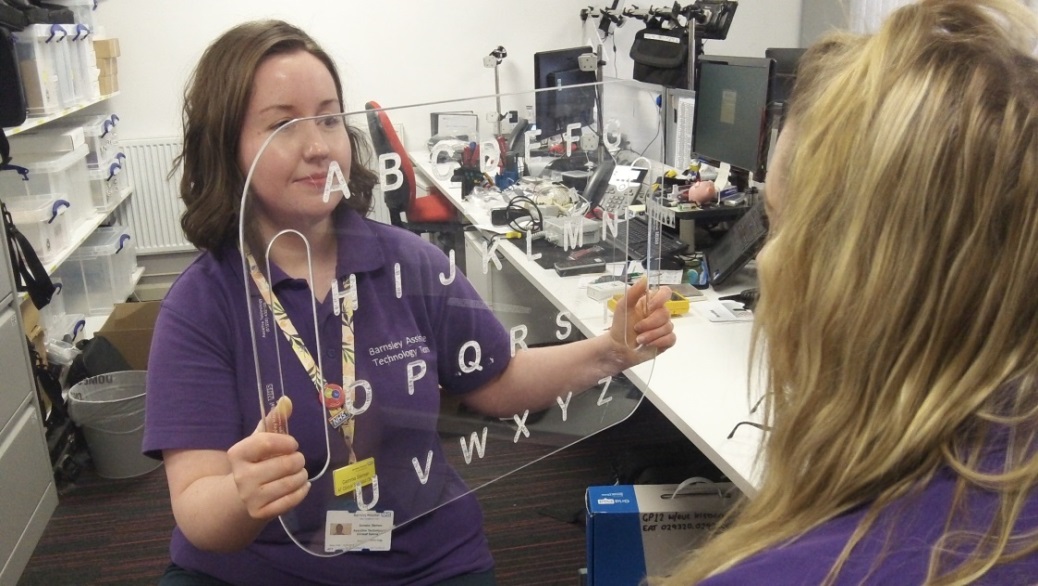
Eyelink in use – being held up
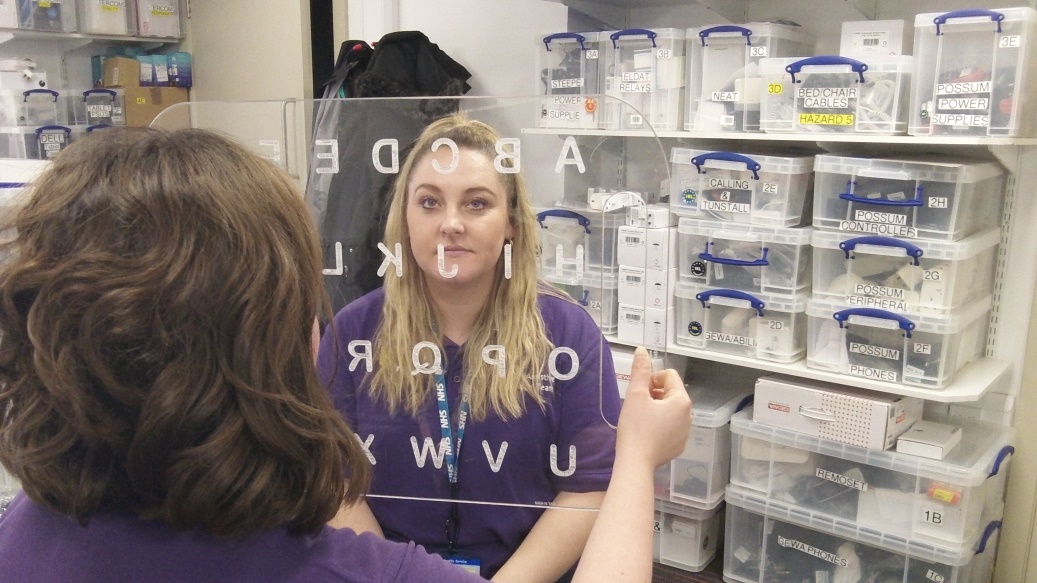
Eyelink in use – gazing at the letter
We have a couple of videos that describe how to use an EyeLink board:
Oops and Finished!
It is important to have a way of saying that you have made a mistake and also that you have finished communicating. It is also helpful to have a way of indicating yes and no – this can allow for the communication partner to predict words being written, and the individual communicating to confirm the prediction. This prediction is a personal choice though and should be negotiated and agreed between the communication partners – some individuals may prefer a communication partner to predict words, and some may not.
How to Make EyeLink
Method 1 – Lightweight EyeLink using Acetate Sheet and a Printer
This method is simpler and requires equipment that is likely to be easier to source, the board is lighter and so easier to hold up, but the letters are black and so slightly harder to see past and the board may be slightly less robust.
Equipment needed:
- A3 laser printer
- A3 (laser safe) acetate suitable for printing on (also known as Overhead Projector Transparencies (remember these?!))
- A3 laminator and laminating pouches.
Instructions for Assembly:
- Download the design template, open in Word or other word processor or in PDF viewer.
- Check/Set page settings to A3.
- Make any customisation to the board specific to the individual (e.g. adding specific words, or using symbols). Make sure you keep space around the edge for the board to be held.
- Put the acetate in the printer and print the design on the acetate:
- Do a test print on A3 paper
- Ensure that the A3 acetate is the correct way around in the printer (if this is important – it depends on the acetate)
- Laminate the A3 acetate to add a bit of rigidity.
- We found that having the laminator on the highest temperature and using the protector as we fed it through gave the best results. The lower temperature versions were cloudy.
Method 2 – Laser Engraving on Perspex sheet
This requires a laser cutter, but is relatively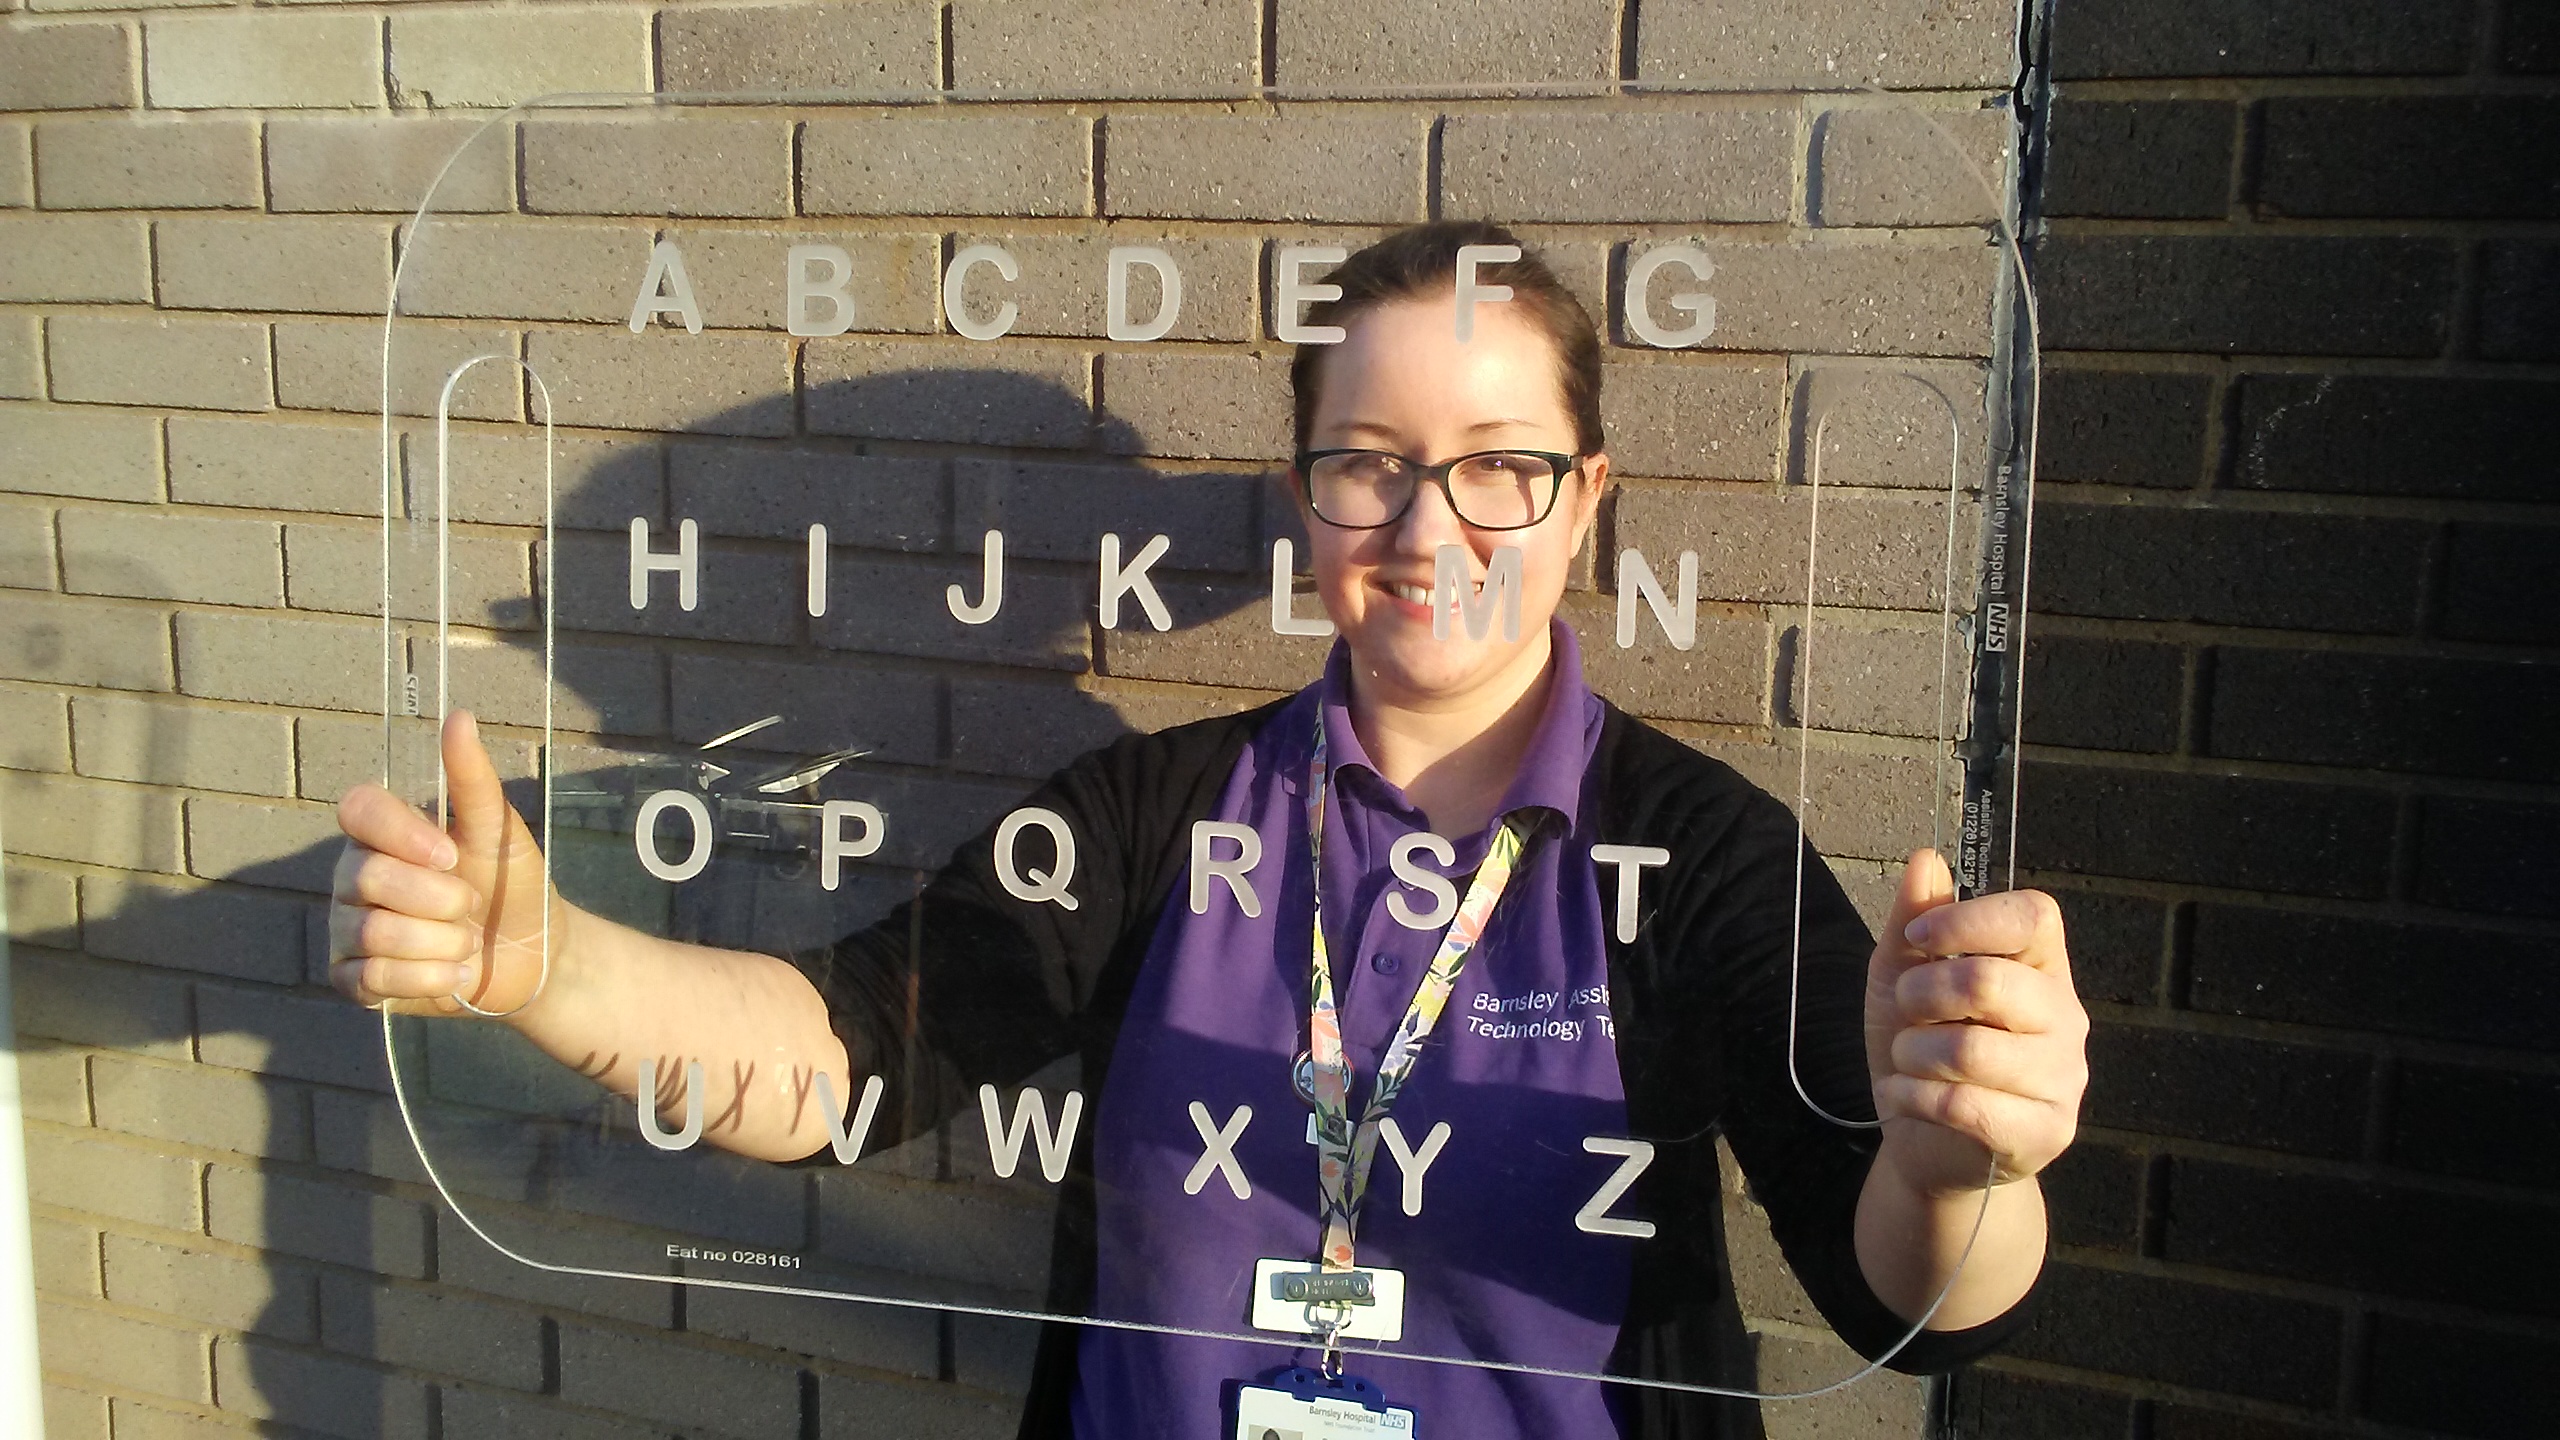 simple if you have access to one. Many secondary school design and technology departments, universities, or hack spaces will have a laser cutter that is appropriate.
For those in our region we can also provide these boards already made although there may be a charge for this.
The board is a bit heavier to hold that the acetate one, but more robust and the translucent letters may make it easier to see the eyes of the person communicating.
Equipment Needed
- Laser Cutter with approx. A3 sized bed (ours is an Epilog Helix. 50W)
- Perspex sheet of appropriate size – e.g. from plastic sheet
Instructions for Assembly:
- Download the relevant design files from Thingverse: www.thingiverse.com/thing:4514958
- Scale the design as appropriate to fit your sheet using the graphics package for the cutter (designs provided in SVG format that can be edited in CorelDraw or InkScape).
- Ensure the laser cutter settings are correct to allow cutting (vector) and engraving (raster).
- Set the laser cutter settings appropriately for the material (on the Epilog Helix 50W laser, this was: cut settings of 15 speed/100 power, raster settings of 90 speed/50 power).
- Send it to the cutter to print!
- Check the board and finish any sharp edges by linishing.
- You may want to use a permanent marker to colour in the engraved letters to help the stand out more.